
Most "AI + your data" setups send your information to someone else's server. Keepra Vault does the opposite: the AI runs a tiny bridge on your machine, talks to the Keepra Vault app over localhost, and only ever sees what a key you created allows. No cloud relay, no copy of your data anywhere else.
This guide gets you connected in about three minutes, with real screenshots of every screen, and works for Claude (Desktop & Code), ChatGPT, Cursor, Windsurf, or any MCP-compatible client. Verified current as of Keepra Vault v1.3.8.
claude mcp add keepra --env KEEPRA_KEY=YOUR_KEY -- npx -y keepra-mcpWhat you need
- The Keepra Vault desktop app, installed and running. The bridge talks to it, so the app must be open. Download it here (Windows; macOS and Linux coming).
- Node.js installed (the
npxcommand needs it). Get Node.js. - An MCP-capable AI client: Claude Desktop, Claude Code, Cursor, Windsurf, or ChatGPT with connectors.
How it works (30-second mental model)
When you send a prompt like "add a task to call the dentist tomorrow," your AI client launches npx -y keepra-mcp. That little program is a bridge: it speaks the Model Context Protocol to your AI on one side, and a small local HTTP API to the Keepra Vault app on the other (127.0.0.1). Keepra Vault checks the key you passed, confirms the action is inside that key's scope, performs it, and returns the result. The diagram above shows the full path, and note that it never leaves your computer.
Step 1: Create an AI Access key in Keepra Vault
Open Keepra Vault and go to MCP Connector in the sidebar (or press Ctrl+8). This is your control panel for AI access:
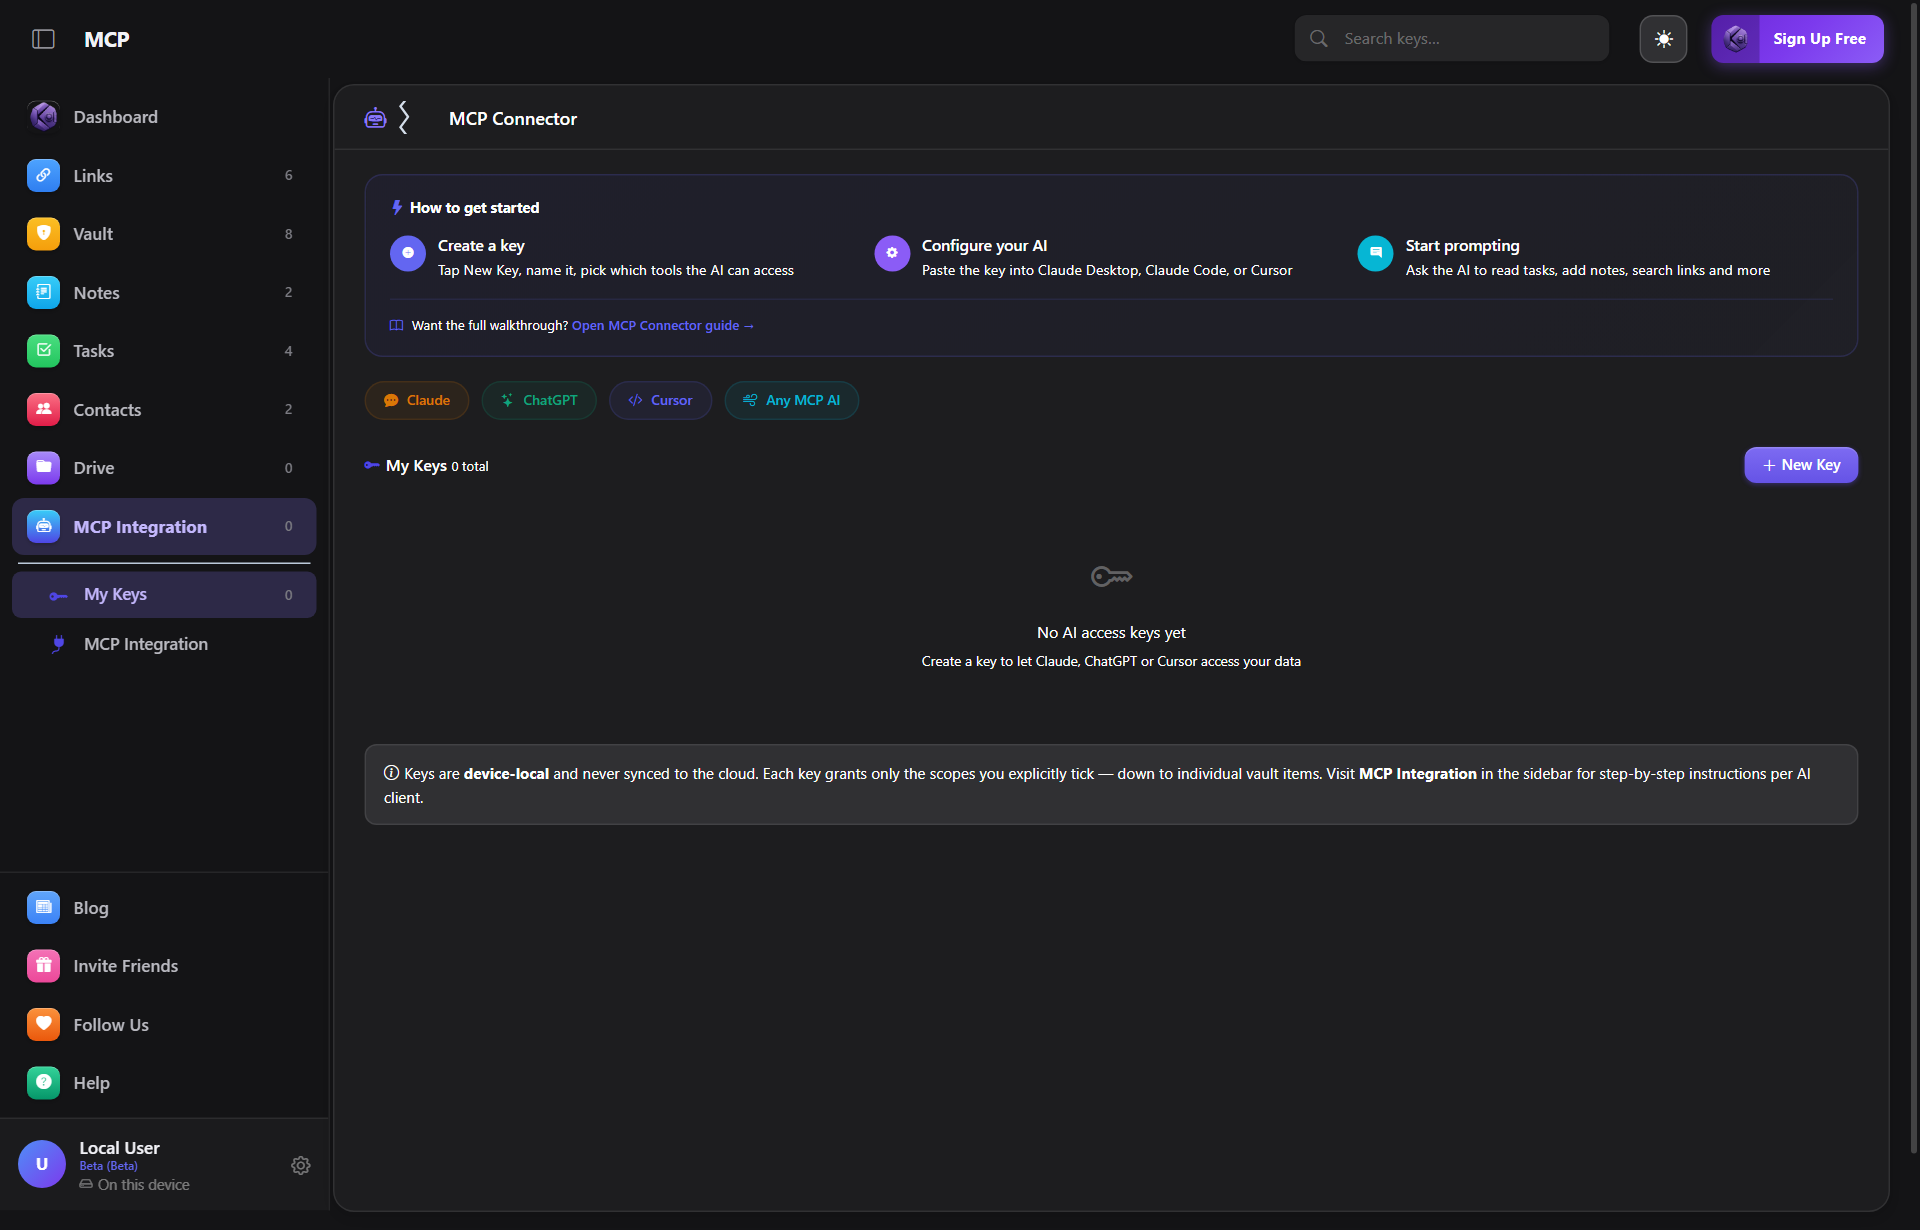
Click + New Key. You will name the key and pick exactly what the AI is allowed to touch, this is the heart of Keepra Vault's safety model:
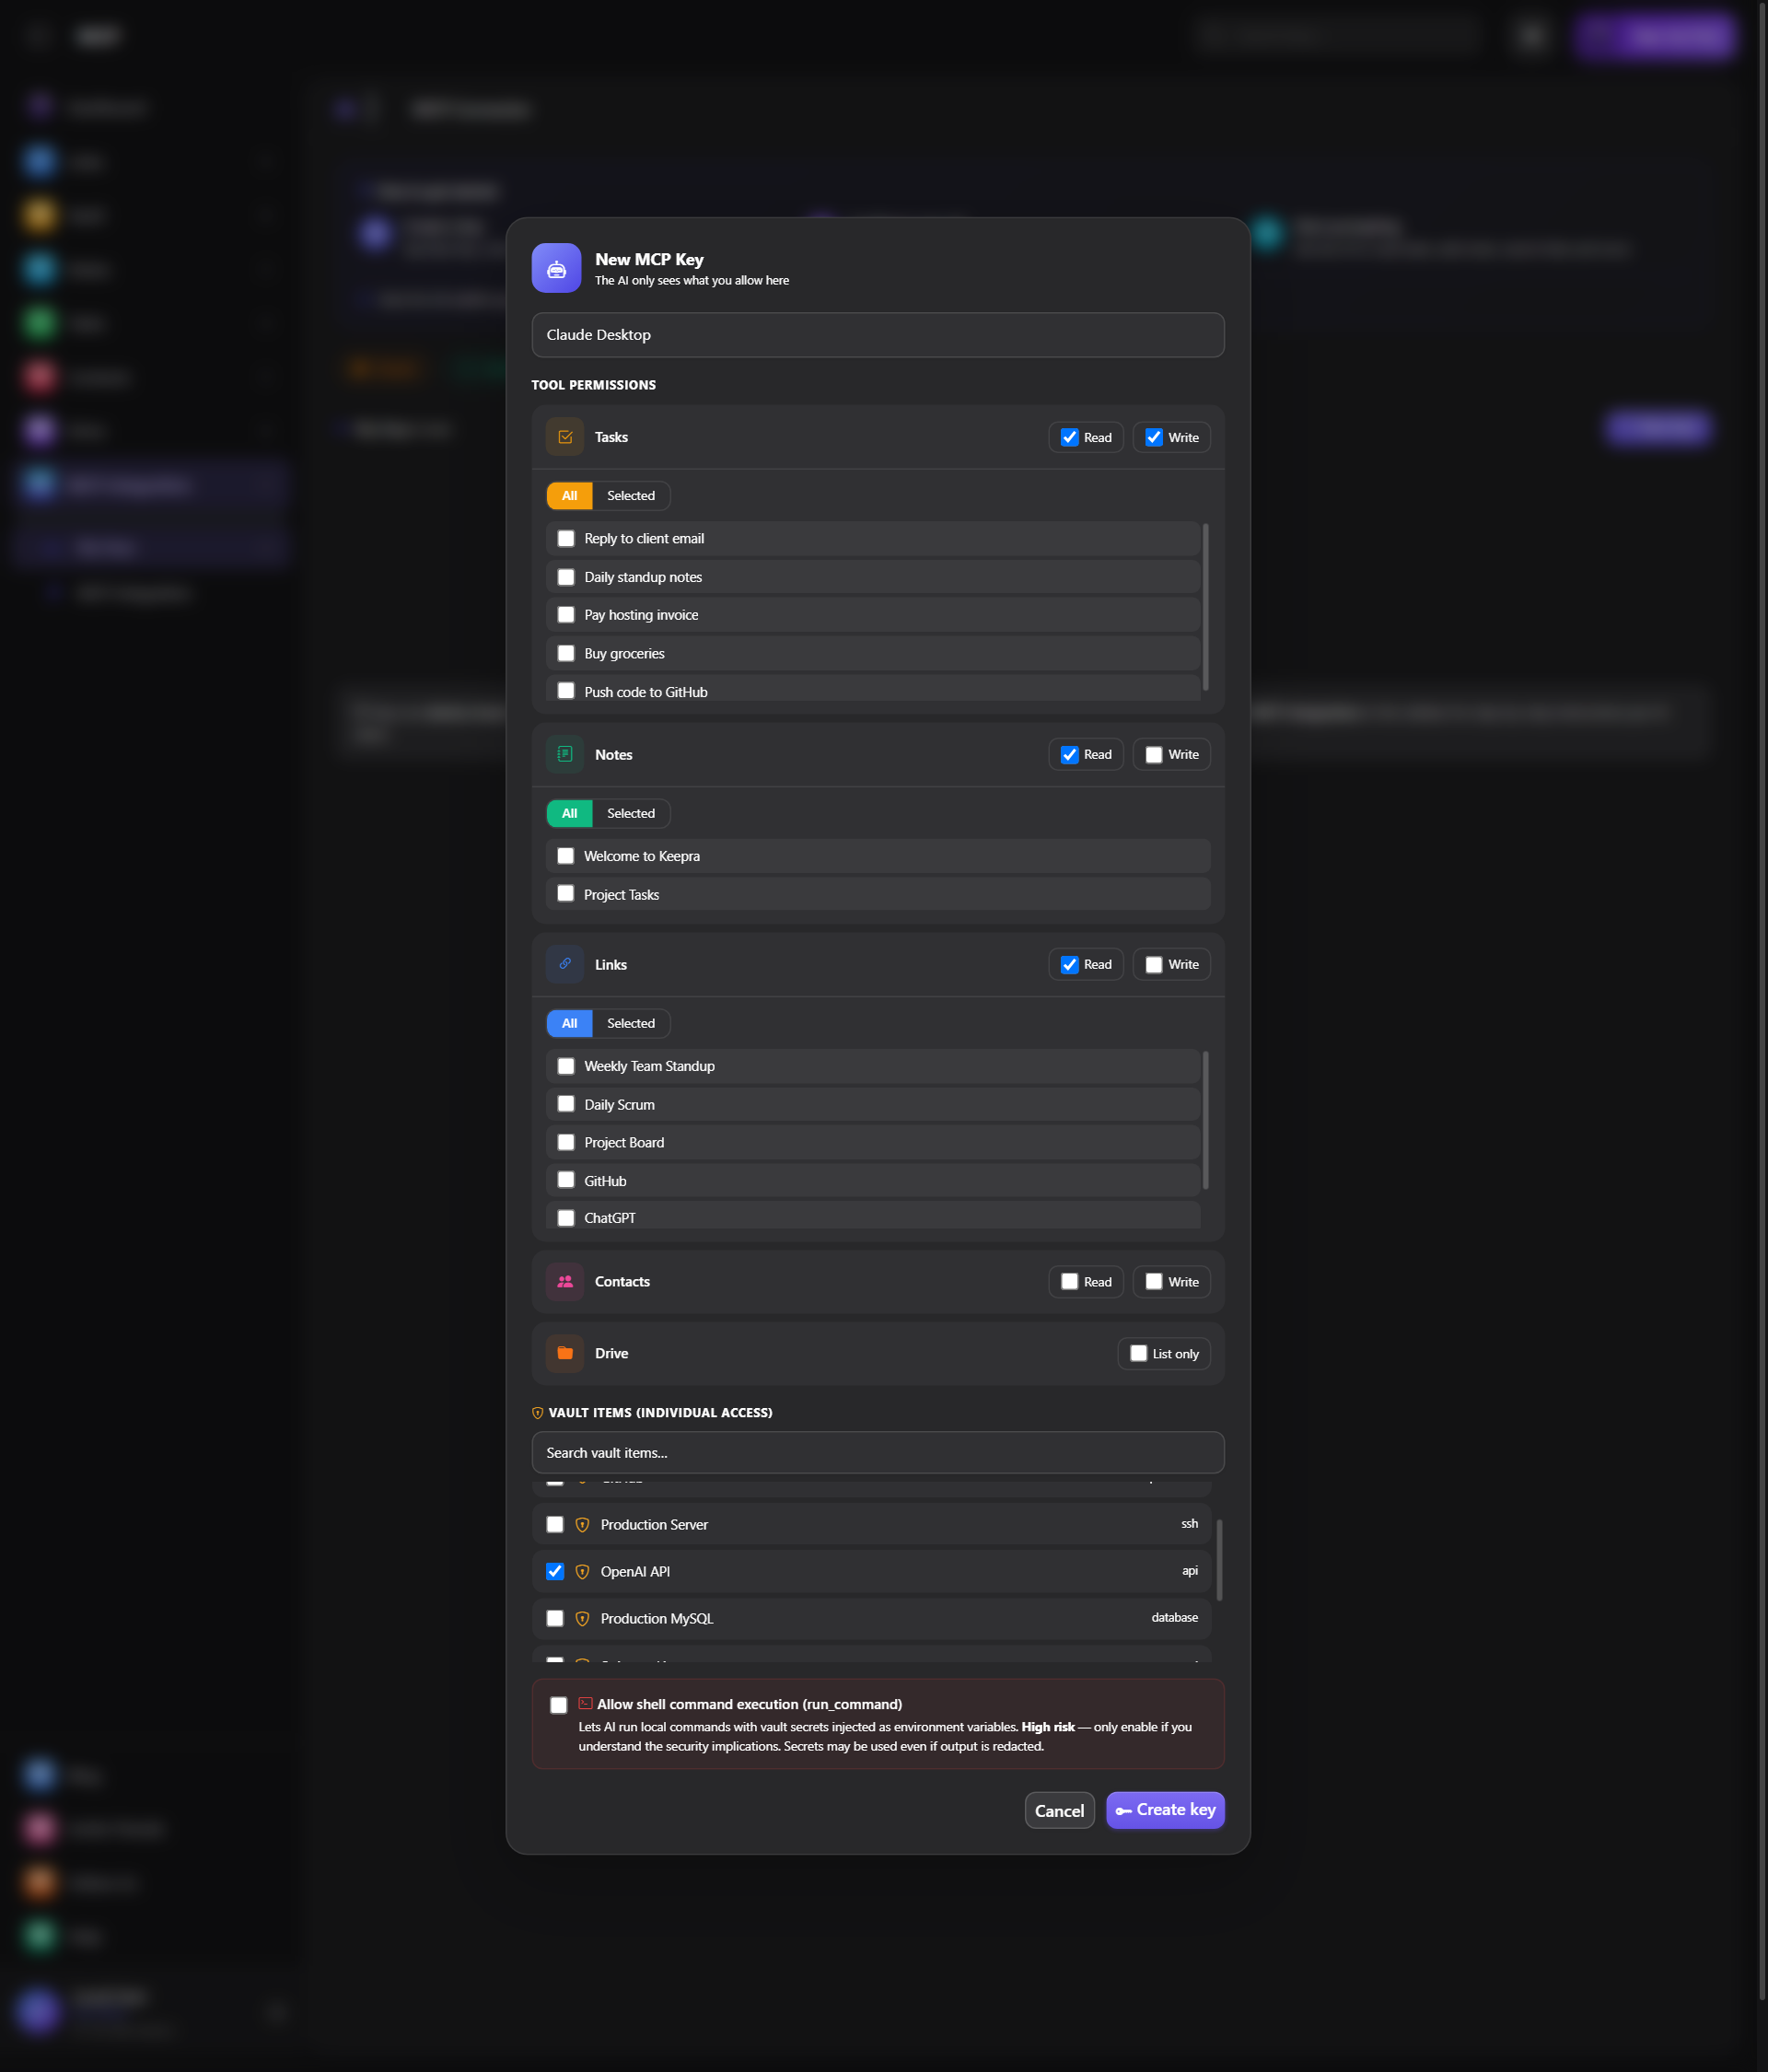
- Give the key a clear name (e.g. "Claude Desktop" or "Cursor").
- Under Tool Permissions, tick Read and/or Write for Tasks, Notes, Links, Contacts. Leave anything off that the AI does not need.
- For the Vault, nothing is shared by default. If you want the AI to use a specific credential, tick that individual item under Vault Items (in the screenshot above, just the OpenAI API key), never the whole vault.
- Click Create key and copy the value (it looks like
kp_…). Keep it handy for Step 2.
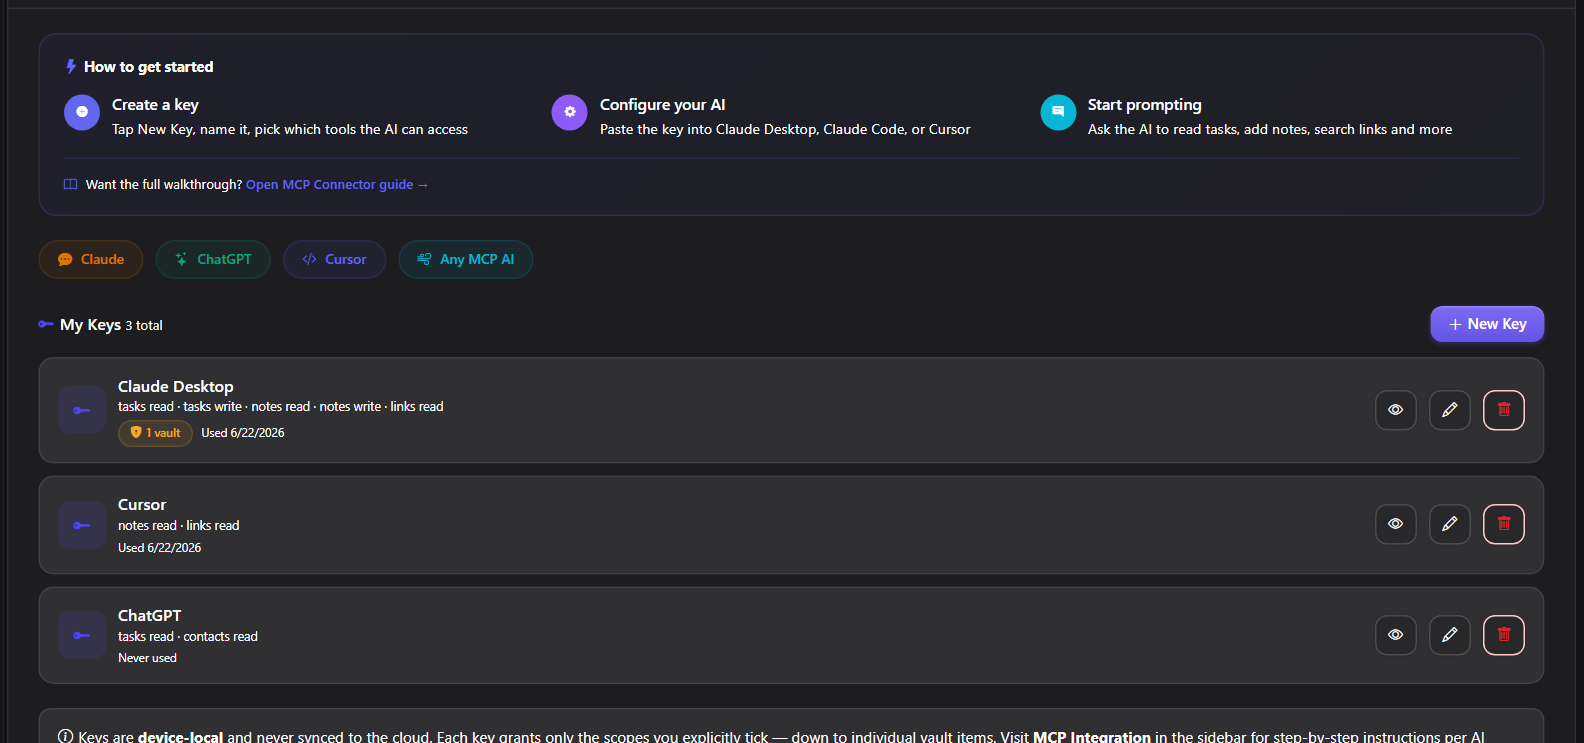
Your new key now appears under My Keys in the MCP Connector tab. Each card shows exactly what that key can touch (its scopes and a vault badge), and gives you buttons to reveal, rename, or revoke it at any time:
Click the eye () button on a key to reveal it. Keepra Vault opens a panel with your kp_… key value, a one-click Copy, the auto-rotation setting, and the exact Config JSON for your chosen client, plus a regenerate button if the key is ever exposed:
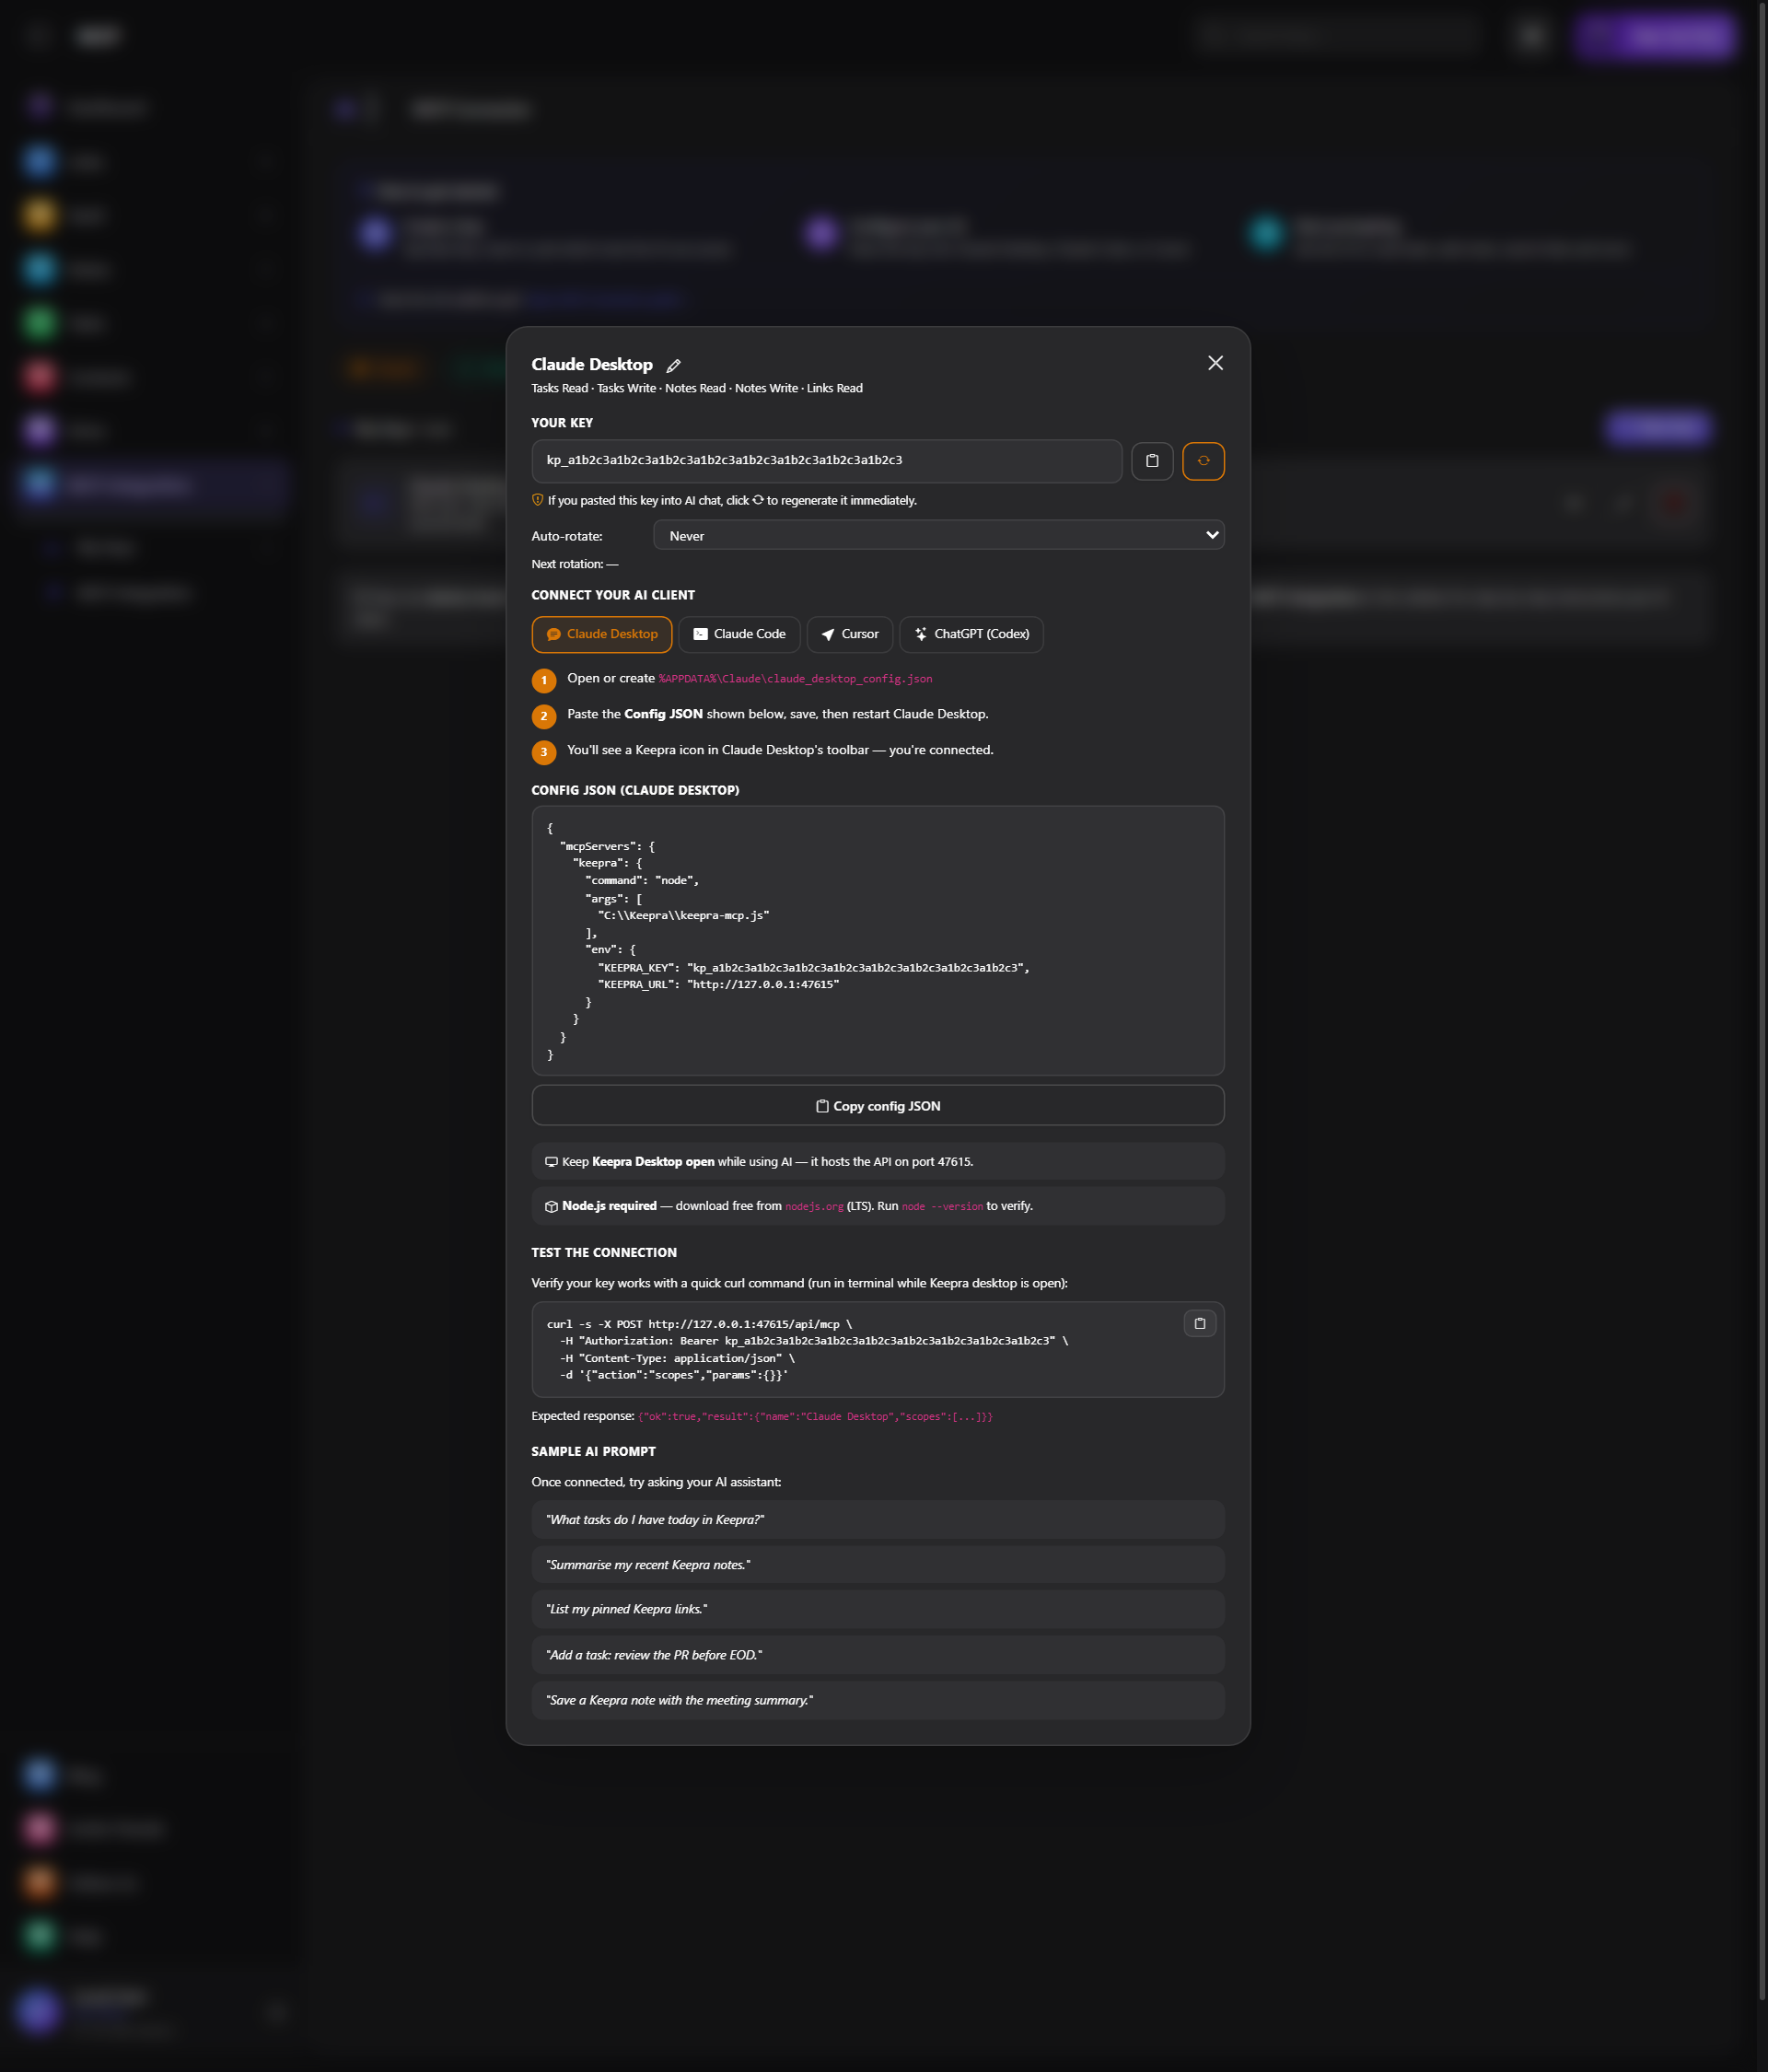
kp_… value like a password, paste it only into your client's config file, never into a chat.Step 2: Connect your AI client
The fastest path: click Copy in the reveal panel from Step 1 (shown above), which gives you the exact config for the client tab you picked, then paste it where your client expects it. If you would rather copy from here, every client uses the same server, npx -y keepra-mcp (the published keepra-mcp package, no file paths, no manual install):
{
  "mcpServers": {
    "keepra": {
      "command": "npx",
      "args": ["-y", "keepra-mcp"],
      "env": {
        "KEEPRA_KEY": "YOUR_KEY",
        "KEEPRA_URL": "http://127.0.0.1:47615"
      }
    }
  }
}
Replace YOUR_KEY with the kp_… value from Step 1. That one block works everywhere, you only change where it goes per client:
- Claude Code: skip the file entirely, run
claude mcp add keepra --env KEEPRA_KEY=YOUR_KEY -- npx -y keepra-mcponce. - Claude Desktop: add it to
%APPDATA%\Claude\claude_desktop_config.json(Windows) or~/Library/Application Support/Claude/claude_desktop_config.json(macOS), then quit from the system tray and relaunch. - Cursor:
Ctrl+,→ search "MCP" → Add MCP Server → paste → reload the window. - Windsurf: add it to
~/.codeium/windsurf/mcp_config.json, then restart. - ChatGPT (Desktop): where connectors are available, Settings → Connectors → Add MCP server, Command
npx, Arguments-y keepra-mcp, plus the two env vars.
Step 3: Try it
Make sure the Keepra Vault desktop app is open, then ask your AI in plain language:
"List my Keepra Vault tasks due this week."
"Add a note titled 'Sprint ideas' with three bullet points about onboarding."
"What links did I save under the Work category?"
"Add John Park to my contacts with email john@acme.com."
Your AI calls the matching Keepra Vault tool, the app performs it locally, and you will see the change in Keepra Vault (refresh if needed) and in the AI's reply. If a key lacks a scope, the AI is told exactly which permission to enable, then you grant it in the MCP Connector.
When do you actually need to restart your AI client?
This trips people up, so here's the exact rule:
- First-time setup (pasting the key into a client for the first time): restart once, right after. The client only reads its MCP config on startup.
- The key's value changes (you regenerated it): restart once again, same reason.
- You grant an already-connected key more scopes or vault items (e.g. it could already read Tasks, and you just ticked Notes too): no restart needed. The scope check refreshes automatically within about 5 minutes.
- Keepra Vault app updates to a version that adds new MCP tools: restart your AI client once to see the new tools appear.
In short: paste once, restart once, never again for day-to-day scope changes.
Using a secret (like an API token) without the AI ever seeing it
Beyond reading your tasks and notes, a key can also be scoped to a single Vault credential and used with the run_command tool, so your AI can run a real command using that secret without the value ever appearing in your conversation with it. Concretely, this is how you'd let an AI publish a package or push code using a token stored in your Vault:
- Save the token as a Vault credential (type API Key or Token/OAuth), e.g. an npm token or a GitHub PAT.
- Create (or reuse) an AI Access key, and under "Edit access" grant it just that one credential — nothing else in your vault.
- Ask the AI directly: "Run
npm publishin this folder using the npm token from my Vault." The app looks up the field, injects it as an environment variable for that one command, runs it, and returns only the output. The token itself never enters the AI's context, and never appears in your chat.
The same pattern already powers Keepra's own GitHub tools (github_push_branch, github_create_tag, github_release_upload) and FTP deploy tools, if a key is granted access to a GitHub PAT or FTP credential respectively.
Real-world ways people use it
- Morning prep: "Show my tasks due today grouped by priority, and summarize my most recent meeting note."
- Meeting to action items: "Here are my raw notes [paste]. Save them as a note called 'Standup 2026-06-22' and create a task for each action item."
- Before a call: "Look up Acme Corp in my contacts and tell me everything I have, phones, emails, notes."
- Research capture: "Save these links to Keepra Vault under 'AI Research' with the tag mcp: [URLs]."
- Release work: "Publish this npm package using the token from my Vault" or "Push this branch and create a GitHub release" — without ever pasting a credential into the chat.
Why this is safe
- Device-local keys. Keys live on your device and are never synced to the cloud. Revoke any key any time in MCP Connector.
- Scoped to the line. A key only does what you ticked, down to individual vault items. The AI cannot reach anything you did not grant.
- Localhost only. The bridge binds to
127.0.0.1, with no CORS and no external relay. No outside origin can reach it. - No vault writes. The AI cannot create or change credentials, you do that yourself. For secrets, prefer read access to a single item, or use the run-command feature that injects a secret without ever exposing it to the AI.
Troubleshooting
| Symptom | Fix |
|---|---|
| AI says it can't reach Keepra Vault | Make sure the Keepra Vault desktop app is open (the bridge needs it) and that you restarted the AI client after editing its config. |
| "command not found: npx" | Install Node.js, then reopen your terminal / AI client. |
| Access or scope error on a tool | Open MCP Connector, edit the key, and enable the tool or vault item the AI named. |
| Nothing happens in Claude Desktop | Fully quit it from the system tray and relaunch, config is only read on startup. |
FAQ
Does my data go to the cloud or to the AI company? No. The bridge runs locally and talks to the Keepra Vault app on your machine. The AI only receives the specific results of the calls you allow.
Do I need to install anything besides Node? No. npx -y keepra-mcp fetches and runs the latest server automatically, you never install it globally.
Can I use more than one AI? Yes, create a separate key per client (e.g. one for Claude, one for Cursor) so you can manage and revoke them independently.
What can the AI actually do? List and create tasks, read and write notes, list and add links, read and add contacts, list files, and (only if you grant a specific item) read a chosen vault credential.
For the concept behind all this, read What is MCP? Explained Simply. To see it inside a real coding day, see The Developer's AI Workflow.